


This article was first published in August 2014. Almost nine years have passed since then.
In that time, the situation around computers has changed a lot, and a lot of new music editing software has appeared.
Among many new competitors, it is great that audacity has been released (and remained free!) for a long time, while the version of audacity has been improved. As an audacity fan, I am very happy to see this. (The latest version is 3.3.3, released in April 2023.)
Please forgive me if the instructions in this article are written in an older version. Since I have not yet used the latest version, I will update this article to the new version after I have had time to use it. (I think it will probably work just as well…)
I think there are many people who want to copy and edit songs from CDs for dance recitals, karaoke, chorus practice, and other purposes.
As a member of a ballroom dance club, I am asked to do this on a regular basis.
The music editing software I use is called Audacity.
It has a lot of features, but it is easy for anyone to use if you focus on it. And it’s free! I love that it can be used on both Windows and Mac.
I have explained it in an easy-to-understand way so that anyone can use it, and I hope you will try it, too. It is very fun to edit your own songs! (Please use it only for your personal enjoyment to avoid copyright infringement.)
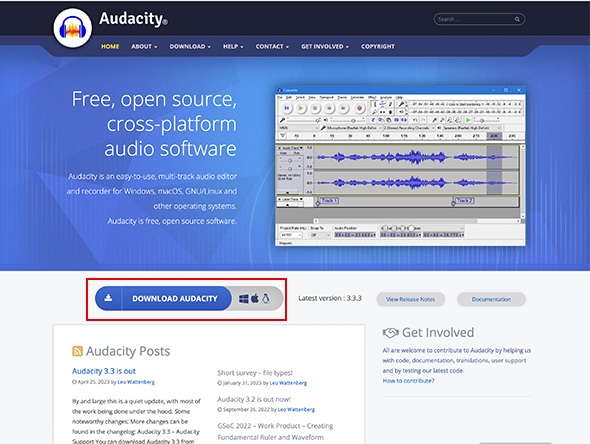
If you have not downloaded Audacity yet, please visit the official website here.
You will see a blue button that says “DOWNLOAD AUDACITY”.
In this article, we will explain the following two steps.
(2) Shortening and processing song data in Audacity
The following is an explanation in the following order.
<1〉Convert CD data to WAV
The data on a CD cannot be handled by editing software as it is. Therefore, it must be converted to an editable format called “WAV (wav or wave).
To convert CD data to WAV, use Windows Media Player . If you do not have it, search for it, download it, and install it.
The following is what you need to do after installation.
- Start Windows Media Player.
- Insert a CD.
- Confirm that “Import Settings” is in the Windows Media Player menu.
If you do not see it, the marker ” 〉” will appear next to “Create Playlist” and you will be able to find it there. - You should see the title and song list of the CD you put in. There will be a square in front of it with a check mark, so click on the one for the song you want to extract (a check mark will appear).
- Select “Import Settings → Format → WAV (lossless)
- Select “Import CD.” This will convert the data (this may take a little time).
- The Import Options screen will appear. Check the middle and bottom check boxes and press “OK” → A green bar will appear indicating that the data is being imported.
- When the importing process is finished, you should see a folder in your “My Music” folder with the name of the CD and the song you selected in it as ○○○○.wav. This is the WAV data that can be used in Audacity.
<2> Open the WAV file in Audacity
Open the WAV file created above in Audacity.
- [Start Audacity.]
Double-click the icon or start Audacity from the Start menu. → The first screen for editing appears. - Open the folder of the CD you just imported in “My Music” and make the song data files (.WAV) visible.
- Drag and drop the icon of the song you want to edit onto the dark gray area of the Audacity screen.
- At this point, the “To import uncompressed audio files…” screen will appear. Check “Uncompressed before editing…” at the top of the import method and select OK. ↓ ↓
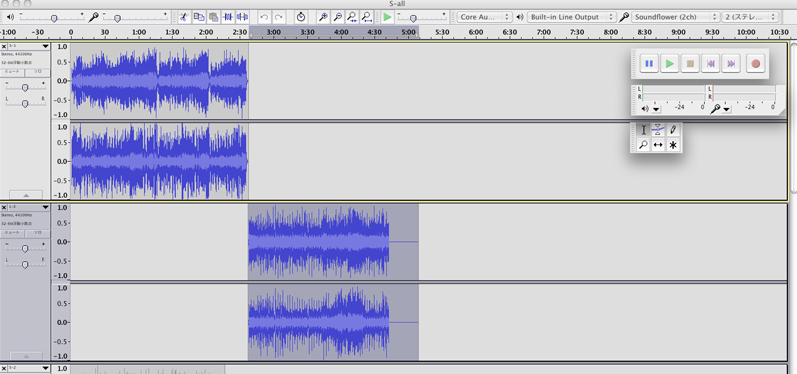
A green bar for importing should appear, and after a short wait, two blue waveforms should appear. This is the data of the imported song. (Since it is stereo, two waveforms appear, one on the left and one on the right.) Once this is done, you can freely edit the data.
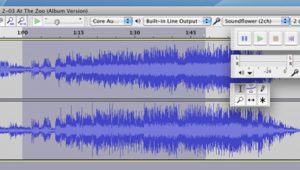
<3> Basic tools of Audacity
You may feel that it is difficult because there are many tools on the screen, but you do not actually use many of them. Also, if you put the mouse pointer over a tool, it will show you what tool it is, which is also helpful.
The six buttons lined up on top. This is where you play and stop the song.
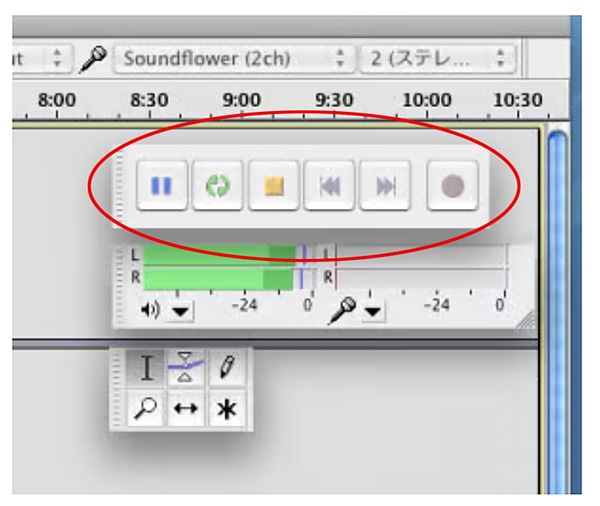
Try pressing the green right-facing triangle button. If the imported song starts playing, it is OK. Press the leftmost two-line button to pause the song, and the third square button to stop the song completely.
The slide bar with a speaker-like mark below it controls the playback volume. (Moving this bar does not affect the volume of the song you are editing.)
When the song is playing, you will see the small green triangle and vertical line move. That is the location where the song is currently playing.
The number is the time from the beginning of the song. If you want to play only a part of the song, drag the area where the time is written.
The left and right arrows will appear and only that area will be played.
<4>Eliminate and fade out
In order to edit and connect songs, you need to erase and fade out . However, this is not difficult.
- If you move the mouse pointer over the waveform area, it will look like the letter “I” in English. Check it out.
- Listen to the song and decide where you want to erase from. If you click the mouse in the waveform area, a vertical line will appear there, and if you click the play button, playback will start from there. Incidentally, at this time, this position (time from the head) will be displayed at the bottom under “Selection Start:”.
- Once the position is determined, drag to the right from there to the end. If it is selected properly, the background will be dark gray.
- Press the delite key on the keyboard to delete the selected area. (There is a small scissors icon in the center of the tools on the editing screen. Pressing it will do the same thing.)
- In the current state, it is cut off. Let’s try fade-out (gradually reduce the sound to mute it). Drag the waveform to select the area you want to fade out.
Once selected, select “Fade Out” from “Effects ” in the menu above. That’s it.
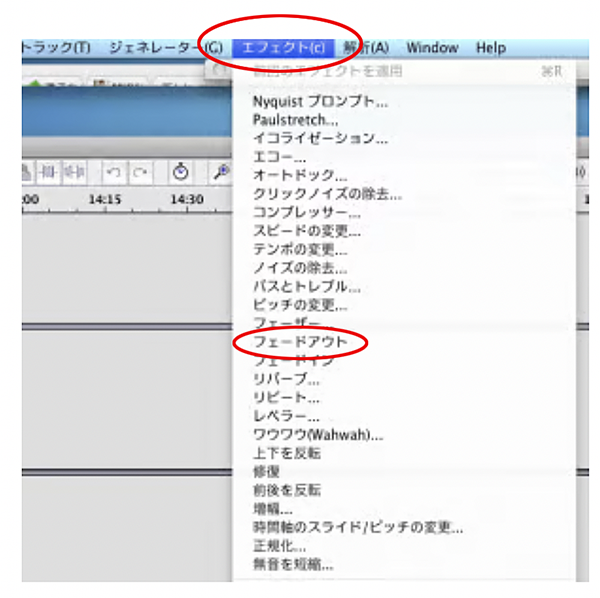
The waveform should become smaller as you go to the right.
At this point, select “Fade Out” in the menu two or three times more, and you will see that the right side of the waveform becomes even smaller. Press the play button to listen to it.
If the “fade-out” time is too long, you will not feel the effect. Usually it is 2 or 3 seconds, 5 seconds at the most. I first roughly delete the second half of the song I want to edit, and then apply the fade-out to the last 2 or 3 seconds of the song.
<5> Fade-in
Once you know how to fade out, fade in is easy.
Fade-in is the opposite of fade-out, which is a gradual increase in volume from silence. Therefore, it is used at the beginning of a song. In the same way as before, delete the unwanted first half of the song, select the first few seconds of the song, and choose “Fade In” from the “Effects” menu.

The left edge of the waveform will become smaller. Listen to it and confirm that it gradually gets louder from silence.
<6> Crossfade
To “connect two songs naturally,” fade out the end of the first song, fade in the beginning of the second song, and blend the two songs by overlapping the fade-in and fade-out. This is a crossfade.
- Drag and drop the icon for the second song while the first song is being imported (displayed); the second song should be imported and have four waveforms.
- As before, delete the second half of the first song and apply a fade-out to the last couple of seconds.
- Delete the first half of the second song as well, and fade in the first few seconds.
Move the song data. To move a song, click on the left and right arrows in the lower center of the six squares next to the six playback circles. - If you move the pointer over the waveform, the pointer will become a left/right arrow. Drag left and right in this state to move the entire song left and right.
- Try to adjust the fade-out and fade-in parts so that they overlap well. At this point, to hear the overlap, drag the area where the time is written. Only the dragged area will be audible.
- Adjust the position of the overlap as you listen so that you like the overlap. When you are satisfied with the overlap, the crossfade is finished.
At the end
I wrote about the basic tools and usage of Audacity.
As I mentioned at the beginning of this article, Audacity is an old software that was introduced 22 years ago (in 2000), but it has been repeatedly upgraded to version 3, and there was a minor update in April this year.
I think it is rare to find software that has lasted this long and is free of charge.
I think one reason is that it is free, but I also think it has a lot of fans because it is easy to use, regardless of the computer, and can easily do what you want to do.
I think that there are few music editing software that can be used so easily, and as one of Audacity’s fans, I hope you will use it in various situations.
 マッキー
マッキーPlease see other articles related to Audacity if you like.
If you want to cut and edit the middle of a song, please refer to this article.

If you want to change the tempo (speed) of a song or audio, please refer to this article.
If you want to extract audio from a movie or DVD, please refer to this article.

Comments
List of comments (9)
マッキー様、初めまして。
音楽編集に挑戦したくてやり方を色々調べている時にこのブログを発見しました。
画像付きの丁寧な解説が分かりやすくて、参考にさせていただきました。
手順通りに挑戦してみたのですが、最初の音楽データをWAVで取り込むところで困っています。
windoows media playerへ音楽データを取り込む際、取り込みの設定をきちんとWAVに選択しても
ダウンロード後に確認するとWAVデータで取り込みできていないのです。
手順を確認しながら何度か挑戦しましたが、いずれも失敗に終わりました。
ちなみに使用しているPCはwindows7、CDは50曲がノンストップのリミックスものです。
(編集で曲間はつなげてありますが、取り込みの際は1曲ずつ50曲取り込むようになってます。)
PCの様式が古いからなのか、CDの様式が悪いのか、途方に暮れています。
お忙しいとは思いますが、時間のある時で構いませんので、アドバイスいただけたら
うれしく思うと同時にありがたいです。
突然の長文コメント、失礼いたしました。
らくたー様
初めまして。運営者のマッキーと申します。
私のブログへのご訪問およびコメントありがとうございます。
わかりやすいと言っていただきとても嬉しいです。
ご質問の件ですが、調べてみますので少しお時間頂戴できますでしょうか。
解決できるかわからないのですが、調べてみて
明日中にはわかった範囲お返事したいと思っています。
お待たせして申し訳ありませんが
どうぞよろしくお願い致します。
らくたー様
マッキーです。お待たせいたしました。
あらためて確認したいのですが、
CDのデータをwindoows media playerに取り込むことはできるけど
それででき上がったファイルがWAVではない、ということでよろしいでしょうか。
何らかの理由でWAVでない形式にしかならなくても、
要はAudacityで開ければいいのだろうと思うのですが、
お困りのご様子からして、それもできないのだろうと思います。
いただいた情報から何が問題というのは、すみませんが私にもわからないのですが
PCの様式が古いとかCDの様式が悪いとかいうことではないような気はします。
解決にはなっていないのですが、
他のソフトを使ってみられたらいかがでしょう。
「cd音源をwavに変換するソフト 無料」で検索するとたくさんの紹介ページがヒットしました。
こちらはその一つですが
↓
https://freesoft-100.com/pasokon/music_encoder.html
『無料CDリッピングソフト一覧 – フリーソフト100』
・Exact Audio Copy
・fre:ac
・LameXP
・CDex Portable
などのソフトがwindoows media playerとともに紹介してありました。
全てWindows7に対応していると書いてあります。
私の方で確認しておりませんので自己責任ということになり、恐縮ですが、
これらのどれかでWAV形式のファイルが作れるのではないかと思います。
いかがでしょうか。
マッキーより
マッキー様
早速のご返信、ありがとうございます。
仰る通りでAudacityを開いても取り込んだ音楽データを選択できない状況でした。
PCやCDの問題ではないことが分かり、ホッとしました。
別のソフトでもう一度試してみます。
面識もない私のためにここまでしていただき、感謝の気持ちでいっぱいです。
お忙しい中わざわざ調べていただき、またリンクも貼っていただき
重ね重ねありがとうございます。
らくたー様
ご返信ありがとうございます。
いい加減なことを言ってはいけませんが、
なんとなく、他のソフトでやってみたら
なんとかなるんじゃないかなぁという気はしているのですが・・。
ぜひ試してみてください。
またその後の様子がわかればぜひ教えてください。
うまくいきますようお祈りしております。
マッキーより
マッキー様、初めまして。
私はMP3の音源を繋げて長いBGMを作りたくて
簡単に操作できる編集ソフトを探していました。
やりたいことは単純なのですが、多機能すぎたり英語だったり
私に合ったソフトがなかなか見つかりませんでした。
ですが、こちらの記事を見つけまして
すごく分かりやすく書いてあったので私でもクロスフェードできました。
ありがとうございました!
他の記事も読んでさらに便利に使いこなせるようになりたいと思います。
ジンジャー様
管理人のマッキーです。
ブログへのご訪問、またコメントをいただき、ありがとうございました。
私の記事がジンジャーさんのお役に立ったとのこと、
書いた者として本当に嬉しいです。
良いBGMができてよかったですね!
Audacityは古いソフトですが、今でもとても使いやすいと思います。
おっしゃるように、多機能なソフトはたくさんありますが
本当にやりたいことがわかりにくいという面がありますね。
「わかりやすい」「必要十分」というのは、大事な気がします。
そういう意味で、Audacityは今なお良いソフトと言えると思います。
Audacityを解説している方があまりいらっしゃらないようですし
私の方でもっと研究して記事にしていきたいと思います。
またどうぞお立ち寄りください!
マッキー様、この度Audacityを利用して曲のクロスフェードに挑戦した者です。これまではOnline Audio Joinerを使っていたのですが過日にバージョンアップされ、当方のWindows10では使えなくなっていました。それを知らずにダンスの先生からの「曲の間奏を抜く」という依頼を安請け合いしてしまい、途方に暮れていたところ貴殿のページに行き着きました。結果的に過去最高の出来で曲を繋ぐ事が出来ました! 見ず知らずの者達の為に、こんなに丁寧な説明ページを作って下さっていること、もう感謝しかありません(TT) 本当にありがとうございます。一言お礼を申し上げたく、送信させて頂きます。
ディンドン様
マッキーです。
この度は当ブログへのご訪問およびコメントを頂戴しましてありがとうございました。
ダンス関連で曲の編集を、というのは私と同じですね!(*^_^*)
きれいにクロスフェードができたとのこと、本当に良かったです。
私の記事が他の方のお役に立てるというのが本当になにより嬉しいです。
こちらこそありがとうございます。
Audacityは古いソフトですが、とても面白いし今でも十分使えます。
さらに他のAudacityの使い方も書いていきたいと思います。
またどうぞお立ち寄りください。
ダンスの発表会、頑張ってくださいね! >^_^<